-
Peak, trailhead and route data is saved to your device when you first open the app and updated when data changes on 14ers.com.
However, to save space, route photos are not automatically stored in the app and you must take action before you leave for a trip in order to have access
to them once you're in the backcountry.
To ensure you have route photos available in the backcountry, navigate to the desired route and do one of the following:
- Bookmark the route by tapping the bookmark icon on the top right.
- Tap the blue download button on the right side of the Ready for Offline Use? box.
- Scroll to the bottom of the route and tap Save Maps/Images for Offline.
 Once you've done this, a check mark will display on routes that have photos (and offline map packs) saved for offline use.
Before you leave for the backcountry, look for that check mark on the route! If you want to remove these images to free up space on your device, select "Delete Saved Photos" on the bottom of the route page(s) or navigate to
Settings->Storage
.
Once you've done this, a check mark will display on routes that have photos (and offline map packs) saved for offline use.
Before you leave for the backcountry, look for that check mark on the route! If you want to remove these images to free up space on your device, select "Delete Saved Photos" on the bottom of the route page(s) or navigate to
Settings->Storage
.
3D Flythroughs & Offline Maps
Added to the app in 2026, map packs can be downloaded from 14ers.com, providing offline access to high resolution maps and 3D Route Flythroughs. To have them offline, all you have to do is download one or both of the map packs for your route and you'll have the necessary offline map data for all routes in that peak group.
Just select the desired packs when you bookmark your route, or click the blue download button on the right side of the Ready for Offline Use? box.


-
The AllTrails® mobile app is good for established trails where you don't need much guidance to have a safe and successful hike. 14ers.com is far more and designed for the Colorado 14ers. The 14ers, and many other high peaks in Colorado, are different because many don't have a trail to the top. Additionally, the more-difficult 14ers have dangerous sections and require careful route-finding and technical skills. Since 14ers.com is essentially a guidebook for the 14ers, it provides accurate, detailed route descriptions, photos, mapping, mobile apps, GPX tracks and other tools. It's way more 14er information than what you'll find on AllTrails® and when you get to the more difficult 14ers, the advantages of 14ers.com will become obvious.
-
Yes. The app uses the same text, photos and maps that you'll find on the website. When routes are updated on 14ers.com, changes are automatically picked up by the app so it has the most up-to-date information.
-
We keep the route descriptions current by applying updates when something changes on the ground. This could be a physical trail re-route by trail maintenance crews or a change due to erosion or other natural event. Additionally, the routes are re-climbed often to obtain the most helpful photos. App route descriptions are dynamic and updates are retrieved from 14ers.com when the occur.
-
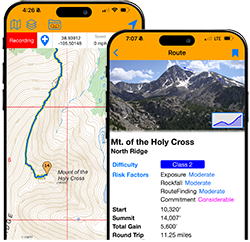
Compared to many mountains around the world, the Colorado 14ers aren't too difficult but we still face plenty of risk every time we climb. When planning a climb, we check the weather forecast to avoid the risk of being caught in a thunder storm. In winter, we assess the avalanche risk to avoid dangerous terrain. Additionally, there are risks specific to each route that don't change from day-to-day and should be considered before heading out. On 14ers.com we've come up with a scale from Low to Extreme to rate the risk of exposure, rockfall potential, route-finding difficulties and commitment. Please keep in mind that these ratings are in the context of the 14ers and are not intended as risk factor ratings for all mountains:
Exposure
| Low |
Mild exposure in the area but not along the immediate route. |
| Moderate |
Mild exposure very close to the route. Route options may be limited but you should be able to walk through the exposure area. |
| Considerable |
Dangerous exposure along the immediate route. It should be avoidable with some slow hiking or scrambling. |
| High |
A fall could result in serious injury or death. Moving through the area will require some scrambling or short technical moves. |
| Extreme |
A fall would likely be fatal. Big, sheer drops. |
Rockfall
| Low |
Risk of rock-fall is low either because the route is fairly low angle or the rock is very solid throughout. |
| Moderate |
Rockfall is possible on steeper sections but the route is generally stable. Most Class 2 routes fall into this category. |
| Considerable |
Rockfall is likely on steeper sections. Wear a helmet! |
| High |
Rockfall is very likely, making the route quite dangerous. Climb in a small group, avoid other groups and wear a helmet! |
| Extreme |
Rockfall is unavoidable and the terrain is extremely loose. |
Routefinding
| Low |
Route is easy to follow. |
| Moderate |
Route may have some minor complications and/or lack of trail but it's mostly obvious. |
| Considerable |
Route has several areas which may be confusing so you'll need to pay close attention to route features. |
| High |
Route is fairly complex and will require extra time for careful route-finding. Some cairns may lead you in the wrong direction and it may be easy to get off-route and enter dangerous terrain. |
| Extreme |
Route is very complex with many confusing sections, requiring plenty of time for route-finding so you don't get off-route and into dangerous terrain. Plan ahead, read the route description carefully and take experienced partners. |
Commitment
| Low |
The most difficult sections are short. |
| Moderate |
The more difficult sections are a bit longer and will require a extra time. |
| Considerable |
The more difficult sections are longer and more frequent, requiring extra time. This may also slow your progress on your return so you will need to watch the weather to allow enough time. |
| High |
Due to the complexity and possible regain on your return, you'll need a lot of extra time to climb the difficult sections of the route. Returning will also require extra time. Don't attempt this route if the weather may turn foul. |
| Extreme |
The distance, complexity and lack of retreat options make this the highest level of commitment for a 14er route. Do NOT attempt this route if foul weather is possible or you're not in adequate physical shape to return safely. You'll also need plenty of food and water. |
-
For each 14er route, the approximate elevation gain (in feet) is calculated using the following steps:
- Subtract the starting (trailhead) elevation from the summit elevation to determine the Minimum Gain of the route.
- Determine an approximate amount of Additional Gain based on portions where your route goes downhill before regaining elevation. If you are returning via the same route, double that number because you have to regain it on the way back. Example: If you lost 500 feet of elevation during your ascent, your total additional gain (if you return via the same route) would be 1,000 feet.
- Total Elevation Gain = Minimum Gain + Additional Gain
-
A common problem with any GPS unit, including smartphones, is the "drift" that occurs when tracking. Each time the device plots your current position it can be a bit inaccurate due to the device sensors. Those inaccuracies add up to additional mileage and elevation gain in the final calculations. Many times this inflates your distance and elevation calculations. For the 14ers.com routes, we've GPSed the routes on multiple occasions and carefully removed as much drift as possible to get more accurate measurements. A good term for this process is "smoothing," where extraneous, obviously-inaccurate track points are removed. So, if the app says a route is 9.5 miles roundtrip and your Apple Watch tells you it was 12 miles, it's not 12 miles.
-
The app contains several "base" maps which provide different detail of the terrain. On the map screen, tap the Base Map button, above the map. Overlays are additional layers displayed over your base map and include 14ers, 14er route lines, 13ers and trailheads. Tap the Layers button to add/remove layers.
14ers.com Base Maps
14ers.com has created custom topographical and satellite base maps so we don't have to rely on third party maps that cost us money based on usage/volume. So, when you're using the interactive maps on either the site or mobile app and see these icons, they're actually 14ers.com maps!
-
- Navigate to your route description by tapping the 14ers tab and selecting it from a peak page OR if you've already bookmarked the route, by selecting it from My Routes.
- In the route, scroll down and tap Highlight/Follow Route on Main Map.
- Now on the map, tap the My Location button on the top right to turn on location services. Your current location will display on the map as a blue dot.
- Record a track by tapping the button on the location toolbar. When you're done tracking, tap the Tracking button and select Finish.
- If you don't care to record a track but simply want to follow the route line as you hike, leave the location services ON so you can see your location in relation to the route line.
-
If you can record tracks/waypoints while you hike, they are saved in My Recordings. View the details/stats of your tracks and waypoints as well as organize them into custom folders for easy access. To manage your folders, tap Menu and select Manage Folders.
-
Yes! You can export a recordings by tapping the export button when viewing the recording details. To export multiple recordings into a single output file, go to the recordings list, tap Menu and select Multiple Select. Then, check the recordings you want to include and tap the export button to begin. Multiple Select can also be used to delete recordings or change their folder.
-
Yes! If you have GPX data (tracks/waypoints) you'd like to import into your app recordings, go to My Recordings, tap the main menu on the upper right and choose the Import GPX option. By default, the import will be saved in a new folder so you can manage this import in the future.


 0
0  1
1  2
2  3
3  4
4  5
5  6
6